Contributing guide
This page has details on the preferred contribution workflow and how best to configure your system for a smooth experience contributing to MNE-Python.
Want an example to work through?
A great way to learn to contribute is to work through an actual example. We recommend that you take a look at the GitHub issues marked “easy”, pick one that looks interesting, and work through it while reading this guide!
Overview of contribution process
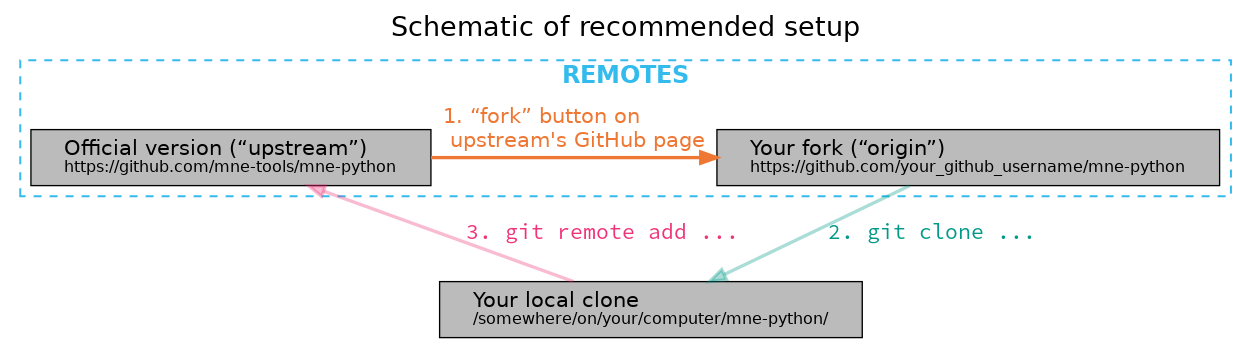
Changes to MNE-Python are typically made by forking the MNE-Python repository, making changes to your fork (usually by cloning it to your personal computer, making the changes locally, and then pushing the local changes up to your fork), and finally creating a pull request to incorporate your changes back into the shared “upstream” version of the codebase.
In general you’ll be working with three different copies of the MNE-Python
codebase: the official remote copy at https://github.com/mne-tools/mne-python
(usually called upstream), your remote fork of the upstream repository
(similar URL, but with your username in place of mne-tools, and usually
called origin), and the local copy of the codebase on your computer. The
typical contribution process is to:
synchronize your local copy with
upstreammake changes to your local copy
push your changes to
origin(your remote fork of the upstream)submit a pull request from your fork into
upstream
The sections Basic git commands and GitHub workflow (below) describe this process in more detail.
Setting up your local development environment
Configuring git
To get set up for contributing, make sure you have git installed on your local computer:
On Linux, the command
sudo apt install gitis usually sufficient; see the official Linux instructions for more options.On MacOS, download the .dmg installer; Atlassian also provides more detailed instructions and alternatives such as using MacPorts or Homebrew.
On Windows, download and install git for Windows. With Git BASH it provides its own shell that includes many Linux-equivalent command line programs that are useful for development.
Windows 10 also offers the Windows subsystem for Linux that offers similar functionality to git BASH, but has not been widely tested by MNE-Python developers yet and may still pose problems with graphical output (e.g. building the documentation)
Once git is installed, the only absolutely necessary configuration step is identifying yourself and your contact info:
$ git config --global user.name "Your Name"
$ git config --global user.email you@yourdomain.example.com
Make sure that the same email address is associated with your GitHub account and with your local git configuration. It is possible to associate multiple emails with a GitHub account, so if you initially set them up with different emails, you can add the local email to the GitHub account.
Sooner or later, git is going to ask you what text editor you want it to use when writing commit messages, so you might as well configure that now too:
$ git config --global core.editor emacs # or vim, or nano, or subl, or...
There are many other ways to customize git’s behavior; see configuring git for more information.
GNU Make
We use GNU Make to organize commands or short scripts that are often needed
in development. These are stored in files with the name Makefile.
MNE-Python has two Makefiles, one in the package’s root directory (containing
mainly testing commands) and one in doc/ (containing recipes for
building our documentation pages in different ways).
To check if make is already installed type
$ make
into a terminal and you should see
make: *** No targets specified and no makefile found. Stop.
If you don’t see this or something similar:
For Linux/MacOS, get GNU Make
For Windows, you can install make for git BASH (which comes with git for Windows):
Download
make-newest.version-without-guile-w32-bin.zipfrom ezwinportsExtract zip-folder
Copy the contents into
path_to_git\mingw64\(e.g. by merging the folders with the equivalent ones already inside)For the first time using git BASH, you need to run once (to be able to activate your mnedev-environment):
$ conda init bash
Forking the MNE-Python repository
Once you have git installed and configured, and before creating your local copy of the codebase, go to the MNE-Python GitHub page and create a fork into your GitHub user account.

This will create a copy of the MNE-Python codebase inside your GitHub user account (this is called “your fork”). Changes you make to MNE-Python will eventually get “pushed” to your fork, and will be incorporated into the official version of MNE-Python (often called the “upstream version”) through a “pull request”. This process will be described in detail below; a summary of how that structure is set up is given here:
Creating the virtual environment
These instructions will set up a Python environment that is separated from your
system-level Python and any other managed Python environments on your computer.
This lets you switch between different versions of Python (MNE-Python requires
version 3.6 or higher) and also switch between the stable and development
versions of MNE-Python (so you can, for example, use the same computer to
analyze your data with the stable release, and also work with the latest
development version to fix bugs or add new features). Even if you’ve already
followed the installation instructions for the stable
version of MNE-Python, you should now repeat that process to create a new,
separate environment for MNE-Python development (here we’ll give it the name
mnedev):
$ curl --remote-name https://raw.githubusercontent.com/mne-tools/mne-python/main/environment.yml
$ conda env create --file environment.yml --name mnedev
$ conda activate mnedev
Now you’ll have two MNE-Python environments: mne (or whatever custom
name you used when installing the stable version of MNE-Python) and mnedev
that we just created. At this point mnedev also has the stable version of
MNE-Python (that’s what the environment.yml file installs), but we’re
about to remove the stable version from mnedev and replace it with the
development version. To do that, we’ll clone the MNE-Python repository from
your remote fork, and also connect the local copy to the upstream version
of the codebase, so you can stay up-to-date with changes from other
contributors. First, edit these two variables for your situation:
$ GITHUB_USERNAME="insert_your_actual_GitHub_username_here"
$ # pick where to put your local copy of MNE-Python development version:
$ INSTALL_LOCATION="/opt"
Note
On Windows, add set before the variable names (set GITHUB_USERNAME=..., etc.).
Then make a local clone of your remote fork (origin):
$ cd $INSTALL_LOCATION
$ git clone https://github.com/$GITHUB_USERNAME/mne-python.git
Finally, set up a link between your local clone and the official repository
(upstream):
$ cd mne-python
$ git remote add upstream git://github.com/mne-tools/mne-python.git
$ git fetch --all
Now we’ll remove the stable version of MNE-Python and replace it with the
development version (the clone we just created with git). Make sure you’re in
the correct environment first (conda activate mnedev), and then do:
$ cd $INSTALL_LOCATION/mne-python    # make sure we're in the right folder
$ pip uninstall -y mne
$ pip install -e .
The command pip install -e . installs a python module into the current
environment by creating a link to the source code directory (instead of copying
the code to pip’s site_packages directory, which is what normally
happens). This means that any edits you make to the MNE-Python source code will
be reflected the next time you open a Python interpreter and import mne
(the -e flag of pip stands for an “editable” installation).
Finally, we’ll add a few dependencies that are not needed for running MNE-Python, but are needed for locally running our test suite:
$ pip install -r requirements_testing.txt
And for building our documentation:
$ pip install -r requirements_doc.txt
$ conda install graphviz
Note
On Windows, if you installed graphviz using the conda command above but still get an error like this:
WARNING: dot command 'dot' cannot be run (needed for graphviz output), check the graphviz_dot setting
try adding the graphviz folder to path:
$ PATH=$CONDA_PREFIX\\Library\\bin\\graphviz:$PATH
To build documentation, you will also require optipng:
On Linux, use the command
sudo apt install optipng.On MacOS, optipng can be installed using Homebrew.
On Windows, unzip
optipng.exefrom the optipng for Windows archive into thedoc/folder.
You can also choose to install some optional linters for reStructuredText:
$ conda install -c conda-forge sphinx-autobuild doc8
Basic git commands
Learning to work with git can take a long time, because it is a complex and powerful tool for managing versions of files across multiple users, each of whom have multiple copies of the codebase. We’ve already seen in the setup commands above a few of the basic git commands useful to an MNE-Python developer:
git clone <URL_OF_REMOTE_REPO>(make a local copy of a repository)git remote add <NICKNAME_OF_REMOTE> <URL_OF_REMOTE_REPO>(connect a local copy to an additional remote)git fetch --all(get the current state of connected remote repos)
Other commands that you will undoubtedly need relate to branches. Branches
represent multiple copies of the codebase within a local clone or remote
repo. Branches are typically used to experiment with new features while still
keeping a clean, working copy of the original codebase that you can switch back
to at any time. The default branch of any repo is called main, and
it is recommended that you reserve the main branch to be that clean copy
of the working upstream codebase. Therefore, if you want to add a new
feature, you should first synchronize your local main branch with the
upstream repository, then create a new branch based off of main and
check it out so that any changes you make will exist on that new branch
(instead of on main):
$ git checkout main            # switch to local main branch
$ git fetch upstream             # get the current state of the remote upstream repo
$ git merge upstream/main      # synchronize local main branch with remote upstream main branch
$ git checkout -b new-feature-x  # create local branch "new-feature-x" and check it out
Now that you’re on a new branch, you can fix a bug or add a new feature, add a test, update the documentation, etc. When you’re done, it’s time to organize your changes into a series of commits. Commits are like snapshots of the repository — actually, more like a description of what has to change to get from the most recent snapshot to the current snapshot.
Git knows that people often work on multiple changes in multiple files all at once, but that ultimately they should separate those changes into sets of related changes that are grouped together based on common goals (so that it’s easier for their colleagues to understand and review the changes). For example, you might want to group all the code changes together in one commit, put new unit tests in another commit, and changes to the documentation in a third commit. Git makes this easy(ish) with something called the stage (or staging area). After you’ve made some changes to the codebase, you’ll have what git calls “unstaged changes”, which will show up with the status command:
$ git status # see what state the local copy of the codebase is in
Those unstaged changes can be added to the stage one by one, by either adding a whole file’s worth of changes, or by adding only certain lines interactively:
$ git add mne/some_file.py      # add all the changes you made to this file
$ git add mne/some_new_file.py  # add a completely new file in its entirety
$ # enter interactive staging mode, to add only portions of a file:
$ git add -p mne/viz/some_other_file.py
Once you’ve collected all the related changes together on the stage, the git
status command will now refer to them as “changes staged for commit”. You can
commit them to the current branch with the commit command. If you just type
git commit by itself, git will open the text editor you configured it to
use so that you can write a commit message — a short description of the
changes you’ve grouped together in this commit. You can bypass the text editor
by passing a commit message on the command line with the -m flag. For
example, if your first commit adds a new feature, your commit message might be:
$ git commit -m 'ENH: adds feature X to the Epochs class'
Once you’ve made the commit, the stage is now empty, and you can repeat the cycle, adding the unit tests and documentation changes:
$ git add mne/tests/some_testing_file.py
$ git commit -m 'add test of new feature X of the Epochs class'
$ git add -p mne/some_file.py mne/viz/some_other_file.py
$ git commit -m 'DOC: update Epochs and BaseEpochs docstrings'
$ git add tutorials/new_tutorial_file.py
$ git commit -m 'DOC: adds new tutorial about feature X'
When you’re done, it’s time to run the test suite to make sure your changes haven’t broken any existing functionality, and to make sure your new test covers the lines of code you’ve added (see Running Tests and Building the documentation, below). Once everything looks good, it’s time to push your changes to your fork:
$ # push local changes to remote branch origin/new-feature-x
$ # (this will create the remote branch if it doesn't already exist)
$ git push origin new-feature-x
Finally, go to the MNE-Python GitHub page, click on the pull requests tab,
click the “new pull request” button, and choose “compare across forks” to
select your new branch (new-feature-x) as the “head repository”. See the
GitHub help page on creating a PR from a fork for more information about
opening pull requests.
If any of the tests failed before you pushed your changes, try to fix them, then add and commit the changes that fixed the tests, and push to your fork. If you’re stuck and can’t figure out how to fix the tests, go ahead and push your commits to your fork anyway and open a pull request (as described above), then in the pull request you should describe how the tests are failing and ask for advice about how to fix them.
To learn more about git, check out the GitHub help website, the GitHub Learning Lab tutorial series, and the pro git book.
Connecting to GitHub with SSH (optional)
One easy way to speed up development is to reduce the number of times you have to type your password. SSH (secure shell) allows authentication with pre-shared key pairs. The private half of your key pair is kept secret on your computer, while the public half of your key pair is added to your GitHub account; when you connect to GitHub from your computer, the local git client checks the remote (public) key against your local (private) key, and grants access your account only if the keys fit. GitHub has several help pages that guide you through the process.
Once you have set up GitHub to use SSH authentication, you should change the
addresses of your MNE-Python GitHub remotes, from https:// addresses to
git@ addresses, so that git knows to connect via SSH instead of HTTPS. For
example:
$ git remote -v  # show existing remote addresses
$ git remote set-url origin git@github.com:$GITHUB_USERNAME/mne-python.git
$ git remote set-url upstream git@github.com:mne-tools/mne-python.git
MNE-Python coding conventions
General requirements
All new functionality must have test coverage
For example, a new mne.Evoked method in mne/evoked.py should
have a corresponding test in mne/tests/test_evoked.py.
All new functionality must be documented
This includes thorough docstring descriptions for all public API changes, as well as how-to examples or longer tutorials for major contributions. Docstrings for private functions may be more sparse, but should usually not be omitted.
Avoid API changes when possible
Changes to the public API (e.g., class/function/method names and signatures)
should not be made lightly, as they can break existing user scripts. Changes to
the API require a deprecation cycle (with warnings) so that users have time to
adapt their code before API changes become default behavior. See the
deprecation section and mne.utils.deprecated for
instructions. Bug fixes (when something isn’t doing what it says it will do) do
not require a deprecation cycle.
Note that any new API elements should be added to the main reference;
classes, functions, methods, and attributes cannot be cross-referenced unless
they are included in the Python API Reference
(doc/python_reference.rst).
Deprecate with a decorator or a warning
MNE-Python has a deprecated() decorator for classes and
functions that will be removed in a future version:
from mne.utils import deprecated

@deprecated('my_function is deprecated and will be removed in 0.XX; please '
            'use my_new_function instead.')
def my_function():
   return 'foo'
If you need to deprecate a parameter, use mne.utils.warn(). For example,
to rename a parameter from old_param to new_param you can do something
like this:
from mne.utils import warn

def my_other_function(new_param=None, old_param=None):
    if old_param is not None:
        depr_message = ('old_param is deprecated and will be replaced by '
                        'new_param in 0.XX.')
        if new_param is None:
            new_param = old_param
            warn(depr_message, DeprecationWarning)
        else:
            warn(depr_message + ' Since you passed values for both '
                 'old_param and new_param, old_param will be ignored.',
                 DeprecationWarning)
    # Do whatever you have to do with new_param
    return 'foo'
When deprecating, you should also add corresponding test(s) to the relevant test file(s), to make sure that the warning(s) are being issued in the conditions you expect:
# test deprecation warning for function
with pytest.warns(DeprecationWarning, match='my_function is deprecated'):
    my_function()

# test deprecation warning for parameter
with pytest.warns(DeprecationWarning, match='values for both old_param'):
    my_other_function(new_param=1, old_param=2)
with pytest.warns(DeprecationWarning, match='old_param is deprecated and'):
    my_other_function(old_param=2)
You should also search the codebase for any cases where the deprecated function or parameter are being used internally, and update them immediately (don’t wait to the end of the deprecation cycle to do this). Later, at the end of the deprecation period when the stated release is being prepared:
delete the deprecated functions
remove the deprecated parameters (along with the conditional branches of
my_other_functionthat handle the presence ofold_param)remove the deprecation tests
double-check for any other tests that relied on the deprecated test or parameter, and (if found) update them to use the new function / parameter.
Describe your changes in the changelog
Include in your changeset a brief description of the change in the
changelog (doc/changes/latest.inc; this can be
skipped for very minor changes like correcting typos in the documentation).
There are different sections of the changelog for each release, and separate subsections for bugfixes, new features, and changes to the public API. Please be sure to add your entry to the appropriate subsection.
The styling and positioning of the entry depends on whether you are a first-time contributor or have been mentioned in the changelog before.
First-time contributors
Welcome to MNE-Python! We’re very happy to have you here. 🤗 And to ensure you get proper credit for your work, please add a changelog entry with the following pattern at the top of the respective subsection (bugfix, new feature etc.):
Bug
---

.. |Your Name| replace:: **Your Name**

- Short description of the changes (:gh:`0000` **by new contributor** |Your Name|_)

- ...
where 0000 must be replaced with the respective GitHub pull request (PR)
number.
It is usually best to wait to add a line to the changelog until your PR is finalized, to avoid merge conflicts (since the changelog is updated with almost every PR).
Lastly, make sure that your name is included in the list of authors in
doc/changes/names.inc, otherwise the documentation build will fail.
To add an author name, simply append a line with the following pattern (note
how the syntax is different from that used in the changelog):
.. _Your Name: https://www.your-website.com/
Many contributors opt to link to their GitHub profile that way. Have a look at the existing entries in the file to get some inspiration.
Recurring contributors
The changelog entry should follow the following patterns:
- Short description of the changes from one contributor (:gh:`0000` by `Contributor Name`_)
- Short description of the changes from several contributors (:gh:`0000` by `Contributor Name`_, `Second Contributor`_, and `Third Contributor`_)
where 0000 must be replaced with the respective GitHub pull request (PR)
number. Mind the Oxford comma in the case of multiple contributors.
Sometimes, changes that shall appear as a single changelog entry are spread out across multiple PRs. In this case, simply name all relevant PRs, separated by commas:
- Short description of the changes from one contributor in multiple PRs (:gh:`0000`, :gh:`1111` by `Contributor Name`_)
- Short description of the changes from several contributors in multiple PRs (:gh:`0000`, :gh:`1111` by `Contributor Name`_, `Second Contributor`_, and `Third Contributor`_)
Test locally before opening pull requests (PRs)
MNE-Python uses continuous integration (CI) to ensure code quality and test across multiple installation targets. However, the CIs are often slower than testing locally, especially when other contributors also have open PRs (which is basically always the case). Therefore, do not rely on the CIs to catch bugs and style errors for you; run the tests locally instead before opening a new PR and before each time you push additional changes to an already-open PR.
Make tests fast and thorough
Whenever possible, use the testing dataset rather than one of the sample
datasets when writing tests; it includes small versions of most MNE-Python
objects (e.g., Raw objects with short durations and few
channels). You can also check which lines are missed by the tests, then modify
existing tests (or write new ones) to target the missed lines. Here’s an
example that reports which lines within mne.viz are missed when running
test_evoked.py and test_topo.py:
$ pytest --cov=mne.viz --cov-report=term-missing mne/viz/tests/test_evoked.py mne/viz/tests/test_topo.py
You can also use pytest --durations=5 to ensure new or modified tests will
not slow down the test suite too much.
Code style
Adhere to standard Python style guidelines
All contributions to MNE-Python are checked against style guidelines described
in PEP 8. We also check for common coding errors (such as variables that are
defined but never used). We allow very few exceptions to these guidelines, and
use tools such as pep8, pyflakes, and flake8 to check code style
automatically. From the mne-python root directory, you can check for
style violations by running:
$ make flake
in the shell. Several text editors or IDEs also have Python style checking,
which can highlight style errors while you code (and train you to make those
errors less frequently). This functionality is built-in to the Spyder IDE, but
most editors have plug-ins that provide similar functionality. Search for
python linter <name of your favorite editor> to learn more.
Use consistent variable naming
Classes should be named using CamelCase. Functions and instances/variables
should use snake_case (n_samples rather than nsamples). Avoid
single-character variable names, unless inside a comprehension or generator.
We (mostly) follow NumPy style for docstrings
In most cases you can look at existing MNE-Python docstrings to figure out how yours should be formatted. If you can’t find a relevant example, consult the Numpy docstring style guidelines for examples of more complicated formatting such as embedding example code, citing references, or including rendered mathematics. Note that we diverge from the NumPy docstring standard in a few ways:
We use a module called
sphinxcontrib-bibtexto render citations. Search our source code (git grep footciteandgit grep footbibliography) to see examples of how to add in-text citations and formatted references to your docstrings, examples, or tutorials. The structured bibliographic data lives indoc/references.bib; please follow the existing key scheme when adding new references (e.g.,Singleauthor2019,AuthoroneAuthortwo2020,FirstauthorEtAl2021a,FirstauthorEtAl2021b).We don’t explicitly say “optional” for optional keyword parameters (because it’s clear from the function or method signature which parameters have default values).
For parameters that may take multiple types, we use pipe characters instead of the word “or”, like this:
param_name : str | None.We don’t include a
RaisesorWarnssection describing errors/warnings that might occur.
Private function/method docstrings may be brief for simple functions/methods, but complete docstrings are appropriate when private functions/methods are relatively complex. To run some basic tests on documentation, you can use:
$ pytest mne/tests/test_docstring_parameters.py
$ make docstyle
Cross-reference everywhere
Both the docstrings and dedicated documentation pages (tutorials, how-to
examples, discussions, and glossary) should include cross-references to any
mentioned module, class, function, method, attribute, or documentation page.
There are sphinx roles for all of these (:mod:, :class:,
:func:, :meth:, :attr:, :doc:) as well as a generic
cross-reference directive (:ref:) for linking to specific sections of a
documentation page.
Warning
Some API elements have multiple exposure points (for example,
mne.set_config and mne.utils.set_config). For cross-references to
work, they must match an entry in doc/python_reference.rst (thus
:func:`mne.set_config` will work but :func:`mne.utils.set_config`
will not).
MNE-Python also uses Intersphinx, so you can (and should)
cross-reference to Python built-in classes and functions as well as API
elements in NumPy, SciPy, etc. See the Sphinx
configuration file (doc/conf.py) for the list of Intersphinx projects
we link to. Their inventories can be examined using a tool like sphobjinv or
dumped to file with commands like:
$ python -m sphinx.ext.intersphinx https://docs.python.org/3/objects.inv > python.txt
Note that anything surrounded by single backticks that is not preceded by one
of the API roles (:class:, :func:, etc) will be assumed to be
in the MNE-Python namespace. This can save some typing especially in
tutorials; instead of see :func:`mne.io.Raw.plot_psd` for details you can
instead type see `mne.io.Raw.plot_psd` for details.
Other style guidance
Use single quotes whenever possible.
Prefer generators or comprehensions over
filter(),map()and other functional idioms.Use explicit functional constructors for builtin containers to improve readability (e.g., list(), dict(), set()).
Avoid nested functions or class methods if possible — use private functions instead.
Avoid
*argsand**kwargsin function/method signatures.
Code organization
Importing
Import modules in this order, preferably alphabetized within each subsection:
Python built-in (
copy,functools,os, etc.)NumPy (
numpy as np) and, in test files, pytest (pytest)MNE-Python imports (e.g.,
from .pick import pick_types)
When importing from other parts of MNE-Python, use relative imports in the main
codebase and absolute imports in tests, tutorials, and how-to examples. Imports
for matplotlib, scipy, and optional modules (sklearn, pandas,
etc.) should be nested (i.e., within a function or method, not at the top of a
file). This helps reduce import time and limit hard requirements for using MNE.
Return types
Methods should modify inplace and return self, functions should return
copies (where applicable). Docstrings should always give an informative name
for the return value, even if the function or method’s return value is never
stored under that name in the code.
Visualization
Visualization capabilities should be made available in both function and method
forms. Add public visualization functions to the mne.viz submodule, and
call those functions from the corresponding object methods. For example, the
method mne.Epochs.plot() internally calls the function
mne.viz.plot_epochs().
All visualization functions must accept a boolean show parameter and
typically return a matplotlib.figure.Figure (or a list of
Figure objects). 3D visualization functions return
a mayavi.core.api.Scene, surfer.Brain, or other return type
as appropriate.
Visualization functions should default to the colormap RdBu_r for signed
data with a meaningful middle (zero-point) and Reds otherwise. This applies
to both visualization functions and tutorials/examples.
Running the test suite
Running the full test suite is as simple as running
$ make test
from the mne-python root folder. Testing the entire module can be quite
slow, however, so to run individual tests while working on a new feature, you
can run, e.g.:
$ pytest mne/tests/test_evoked.py::test_io_evoked --verbose
Or alternatively:
$ pytest mne/tests/test_evoked.py -k test_io_evoked --verbose
Make sure you have the testing dataset, which you can get by running this in a Python interpreter:
>>> mne.datasets.testing.data_path(verbose=True)
Building the documentation
Our documentation (including docstrings in code files) is in reStructuredText format and is built using Sphinx and Sphinx-Gallery. The easiest way to ensure that your contributions to the documentation are properly formatted is to follow the style guidelines on this page, imitate existing documentation examples, refer to the Sphinx and Sphinx-Gallery reference materials when unsure how to format your contributions, and build the docs locally to confirm that everything looks correct before submitting the changes in a pull request.
You can build the documentation locally using GNU Make with
doc/Makefile. From within the doc directory, you can test
formatting and linking by running:
$ make html_dev-noplot
This will build the documentation except it will format (but not execute) the
tutorial and example files. If you have created or modified an example or
tutorial, you should instead run
PATTERN=<REGEX_TO_SELECT_MY_TUTORIAL> make html_dev-pattern to render
all the documentation and additionally execute just your example or tutorial
(so you can make sure it runs successfully and generates the output / figures
you expect).
Note
On Windows, to use the pattern approach, use the following two lines:
set PATTERN={<REGEX_TO_SELECT_MY_TUTORIAL>}
make html_dev-pattern
After either of these commands completes, make show will open the
locally-rendered documentation site in your browser. Additional make
recipes are available; run make help from the doc directory or
consult the Sphinx-Gallery documentation for additional details.
Modifying command-line tools
MNE-Python provides support for a limited set of Command line tools using Python. These are typically used with a call like:
$ mne browse_raw ~/mne_data/MNE-sample-data/MEG/sample/sample_audvis_raw.fif
These are generally available for convenience, and can be useful for quick
debugging (in this case, for mne.io.Raw.plot).
If a given command-line function fails, they can also be executed as part of
the mne module with python -m. For example:
$ python -i -m mne browse_raw ...
Because this was launched with python -i, once the script completes
it will drop to a Python terminal. This is useful when there are errors,
because then you can drop into a post-mortem debugger:
>>> import pdb; pdb.pm()
GitHub workflow
Nearly everyone in the community of MNE-Python contributors and maintainers is a working scientist, engineer, or student who contributes to MNE-Python in their spare time. For that reason, a set of best practices have been adopted to streamline the collaboration and review process. Most of these practices are common to many open-source software projects, so learning to follow them while working on MNE-Python will bear fruit when you contribute to other projects down the road. Here are the guidelines:
Search the MNE-Python issues page (both open and closed issues) in case someone else has already started work on the same bugfix or feature. If you don’t find anything, open a new issue to discuss changes with maintainers before starting work on your proposed changes.
Implement only one new feature or bugfix per pull request (PR). Occasionally it may make sense to fix a few related bugs at once, but this makes PRs harder to review and test, so check with MNE-Python maintainers first before doing this. Avoid purely cosmetic changes to the code; they make PRs harder to review.
It is usually better to make PRs from branches other than your main branch, so that you can use your main branch to easily get back to a working state of the code if needed (e.g., if you’re working on multiple changes at once, or need to pull in recent changes from someone else to get your new feature to work properly).
In most cases you should make PRs into the upstream’s main branch, unless you are specifically asked by a maintainer to PR into another branch (e.g., for backports or maintenance bugfixes to the current stable version).
Don’t forget to include in your PR a brief description of the change in the changelog (
doc/whats_new.rst).Our community uses the following commit tags and conventions:
Work-in-progress PRs should be created as draft PRs and the PR title should begin with
WIP.When you believe a PR is ready to be reviewed and merged, convert it from a draft PR to a normal PR, change its title to begin with
MRG, and add a comment to the PR asking for reviews (changing the title does not automatically notify maintainers).PRs that only affect documentation should additionally be labelled
DOC, bugfixes should be labelledFIX, and new features should be labelledENH(for “enhancement”).STYis used for style changes (i.e., improving docstring consistency or formatting without changing its content).the following commit tags are used to interact with our continuous integration (CI) providers. Use them judiciously; do not skip tests simply because they are failing:
[skip circle]Skip CircleCI, which tests successful building of our documentation.[skip github]Skip our GitHub Actions, which test installation and execution on Linux and macOS systems.[skip azp]Skip azure which tests installation and execution on Windows systems.[ci skip]is an alias for[skip github][skip azp][skip circle]. Notice that[skip ci]is not a valid tag.[circle full]triggers a “full” documentation build, i.e., all code in tutorials and how-to examples will be executed (instead of just nicely formatted) and the resulting output and figures will be rendered as part of the tutorial/example.
This sample pull request exemplifies many of the conventions listed above:
it addresses only one problem; it started with an issue to discuss the problem
and some possible solutions; it is a PR from the user’s non-main branch into
the upstream main branch; it separates different kinds of changes into
separate commits and uses labels like DOC, FIX, and STY to make it
easier for maintainers to review the changeset; etc. If you are new to GitHub
it can serve as a useful example of what to expect from the PR review process.