Note
Go to the end to download the full example code.
Automated epochs metadata generation with variable time windows#
When working with Epochs, metadata can be
invaluable. There is an extensive tutorial on
how it can be generated automatically.
In the brief examples below, we will demonstrate different ways to bound the time
windows used to generate the metadata.
# Authors: Richard Höchenberger <richard.hoechenberger@gmail.com>
#
# License: BSD-3-Clause
# Copyright the MNE-Python contributors.
We will use data from an EEG recording during an Eriksen flanker task. For the purpose of demonstration, we’ll only load the first 60 seconds of data.
import mne

data_dir = mne.datasets.erp_core.data_path()
infile = data_dir / "ERP-CORE_Subject-001_Task-Flankers_eeg.fif"

raw = mne.io.read_raw(infile, preload=True)
raw.crop(tmax=60).filter(l_freq=0.1, h_freq=40)
Opening raw data file /home/circleci/mne_data/MNE-ERP-CORE-data/ERP-CORE_Subject-001_Task-Flankers_eeg.fif...
    Range : 0 ... 935935 =      0.000 ...   913.999 secs
Ready.
Reading 0 ... 935935  =      0.000 ...   913.999 secs...
Filtering raw data in 1 contiguous segment
Setting up band-pass filter from 0.1 - 40 Hz

FIR filter parameters
---------------------
Designing a one-pass, zero-phase, non-causal bandpass filter:
- Windowed time-domain design (firwin) method
- Hamming window with 0.0194 passband ripple and 53 dB stopband attenuation
- Lower passband edge: 0.10
- Lower transition bandwidth: 0.10 Hz (-6 dB cutoff frequency: 0.05 Hz)
- Upper passband edge: 40.00 Hz
- Upper transition bandwidth: 10.00 Hz (-6 dB cutoff frequency: 45.00 Hz)
- Filter length: 33793 samples (33.001 s)
Visualizing the events#
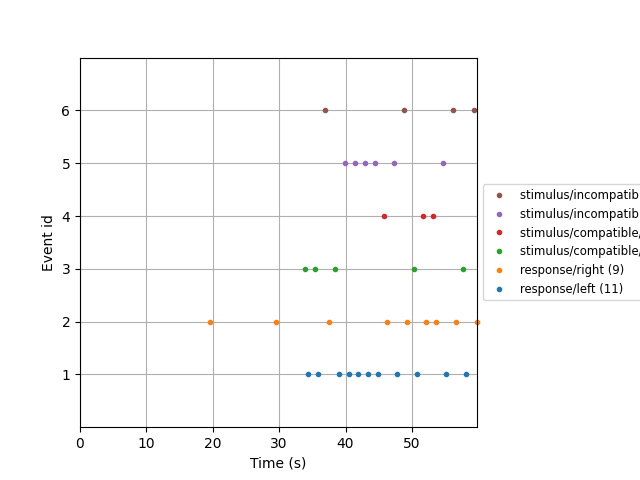
All experimental events are stored in the Raw instance as
Annotations. We first need to convert these to events and the
corresponding mapping from event codes to event names (event_id).
We then visualize the events.
all_events, all_event_id = mne.events_from_annotations(raw)
mne.viz.plot_events(events=all_events, event_id=all_event_id, sfreq=raw.info["sfreq"])

Used Annotations descriptions: [np.str_('response/left'), np.str_('response/right'), np.str_('stimulus/compatible/target_left'), np.str_('stimulus/compatible/target_right'), np.str_('stimulus/incompatible/target_left'), np.str_('stimulus/incompatible/target_right')]
As you can see, there are four types of stimulus and two types of response
events.
Declaring “row events”#
For the sake of this example, we will assume that during analysis our epochs will be
time-locked to the stimulus onset events. Hence, we would like to create metadata with
one row per stimulus. We can achieve this by specifying all stimulus event names
as row_events.
row_events = [
    "stimulus/compatible/target_left",
    "stimulus/compatible/target_right",
    "stimulus/incompatible/target_left",
    "stimulus/incompatible/target_right",
]
Specifying metadata time windows#
Now, we will explore different ways of specifying the time windows around the
row_events when generating metadata. Any events falling within the same time
window will be added to the same row in the metadata table.
Fixed time window#
A simple way to specify the time window extent is by specifying the time in seconds relative to the row event. In the following example, the time window spans from the row event (time point zero) up until three seconds later.
metadata_tmin = 0.0
metadata_tmax = 3.0

metadata, events, event_id = mne.epochs.make_metadata(
    events=all_events,
    event_id=all_event_id,
    tmin=metadata_tmin,
    tmax=metadata_tmax,
    sfreq=raw.info["sfreq"],
    row_events=row_events,
)

metadata
This looks good at the first glance. However, for example in the 2nd and 3rd row, we have two responses listed (left and right). This is because the 3-second time window is obviously a bit too wide and captures more than one trial. While we could make it narrower, this could lead to a loss of events – if the window might become too narrow. Ultimately, this problem arises because the response time varies from trial to trial, so it’s difficult for us to set a fixed upper bound for the time window.
Fixed time window with keep_first#
One workaround is using the keep_first parameter, which will create a new column
containing the first event of the specified type.
metadata_tmin = 0.0
metadata_tmax = 3.0
keep_first = "response"  # <-- new

metadata, events, event_id = mne.epochs.make_metadata(
    events=all_events,
    event_id=all_event_id,
    tmin=metadata_tmin,
    tmax=metadata_tmax,
    sfreq=raw.info["sfreq"],
    row_events=row_events,
    keep_first=keep_first,  # <-- new
)

metadata
As you can see, a new column response was created with the time of the first
response event falling inside the time window. The first_response column specifies
which response occurred first (left or right).
Variable time window#
Another way to address the challenge of variable time windows without the need to
create new columns is by specifying tmin and tmax as event names. In this
example, we use tmin=row_events, because we want the time window to start
with the time-locked event. tmax, on the other hand, are the response events:
The first response event following tmin will be used to determine the duration of
the time window.
metadata_tmin = row_events
metadata_tmax = ["response/left", "response/right"]

metadata, events, event_id = mne.epochs.make_metadata(
    events=all_events,
    event_id=all_event_id,
    tmin=metadata_tmin,
    tmax=metadata_tmax,
    sfreq=raw.info["sfreq"],
    row_events=row_events,
)

metadata
Variable time window (simplified)#
We can slightly simplify the above code: Since tmin shall be set to the
row_events, we can paass tmin=None, which is a more convenient way to express
tmin=row_events. The resulting metadata looks the same as in the previous example.
metadata_tmin = None  # <-- new
metadata_tmax = ["response/left", "response/right"]

metadata, events, event_id = mne.epochs.make_metadata(
    events=all_events,
    event_id=all_event_id,
    tmin=metadata_tmin,
    tmax=metadata_tmax,
    sfreq=raw.info["sfreq"],
    row_events=row_events,
)

metadata
Total running time of the script: (0 minutes 1.592 seconds)