Note
Go to the end to download the full example code.
Parsing events from raw data#
This tutorial describes how to read experimental events from raw recordings, and how to convert between the two different representations of events within MNE-Python (Events arrays and Annotations objects).
In the introductory tutorial we saw an
example of reading experimental events from a “STIM” channel; here we’ll discuss events and annotations more
broadly, give more detailed information about reading from STIM channels, and
give an example of reading events that are in a marker file or included in
the data file as an embedded array. The tutorials Working with events and
Annotating continuous data discuss how to plot, combine, load, save, and
export events and Annotations (respectively), and the
latter tutorial also covers interactive annotation of Raw
objects.
We’ll begin by loading the Python modules we need, and loading the same
example data we used in the introductory tutorial, but to save memory we’ll crop the Raw object
to just 60 seconds before loading it into RAM:
# Authors: The MNE-Python contributors.
# License: BSD-3-Clause
# Copyright the MNE-Python contributors.
import numpy as np

import mne

sample_data_folder = mne.datasets.sample.data_path()
sample_data_raw_file = sample_data_folder / "MEG" / "sample" / "sample_audvis_raw.fif"
raw = mne.io.read_raw_fif(sample_data_raw_file)
raw.crop(tmax=60).load_data()
Opening raw data file /home/circleci/mne_data/MNE-sample-data/MEG/sample/sample_audvis_raw.fif...
    Read a total of 3 projection items:
        PCA-v1 (1 x 10²)  idle
        PCA-v2 (1 x 10²)  idle
        PCA-v3 (1 x 10²)  idle
    Range : 25800 ... 192599 =     42.956 ...   320.670 secs
Ready.
Reading 0 ... 36037  =      0.000 ...    60.000 secs...
The Events and Annotations data structures#
Generally speaking, both the Events and Annotations data
structures serve the same purpose: they provide a mapping between times
during an EEG/MEG recording and a description of what happened at those
times. In other words, they associate a when with a what. The main
differences are:
Units: the Events data structure represents the when in terms of samples, whereas the
Annotationsdata structure represents the when in seconds.Limits on the description: the Events data structure represents the what as an integer “Event ID” code, whereas the
Annotationsdata structure represents the what as a string.How duration is encoded: Events in an Event array do not have a duration (though it is possible to represent duration with pairs of onset/offset events within an Events array), whereas each element of an
Annotationsobject necessarily includes a duration (though the duration can be zero if an instantaneous event is desired).Internal representation: Events are stored as an ordinary
NumPy array, whereasAnnotationsis alist-like class defined in MNE-Python.
What is a STIM channel?#
A stim channel (short for “stimulus channel”) is a channel that does not receive signals from an EEG, MEG, or other sensor. Instead, STIM channels record voltages (usually short, rectangular DC pulses of fixed magnitudes sent from the experiment-controlling computer) that are time-locked to experimental events, such as the onset of a stimulus or a button-press response by the subject (those pulses are sometimes called TTL pulses, event pulses, trigger signals, or just “triggers”). In other cases, these pulses may not be strictly time-locked to an experimental event, but instead may occur in between trials to indicate the type of stimulus (or experimental condition) that is about to occur on the upcoming trial.
The DC pulses may be all on one STIM channel (in which case different
experimental events or trial types are encoded as different voltage
magnitudes), or they may be spread across several channels, in which case the
channel(s) on which the pulse(s) occur can be used to encode different events
or conditions. Even on systems with multiple STIM channels, there is often
one channel that records a weighted sum of the other STIM channels, in such a
way that voltage levels on that channel can be unambiguously decoded as
particular event types. On older Neuromag systems (such as that used to
record the sample data) this “summation channel” was typically STI 014;
on newer systems it is more commonly STI101. You can see the STIM
channels in the raw data file here:
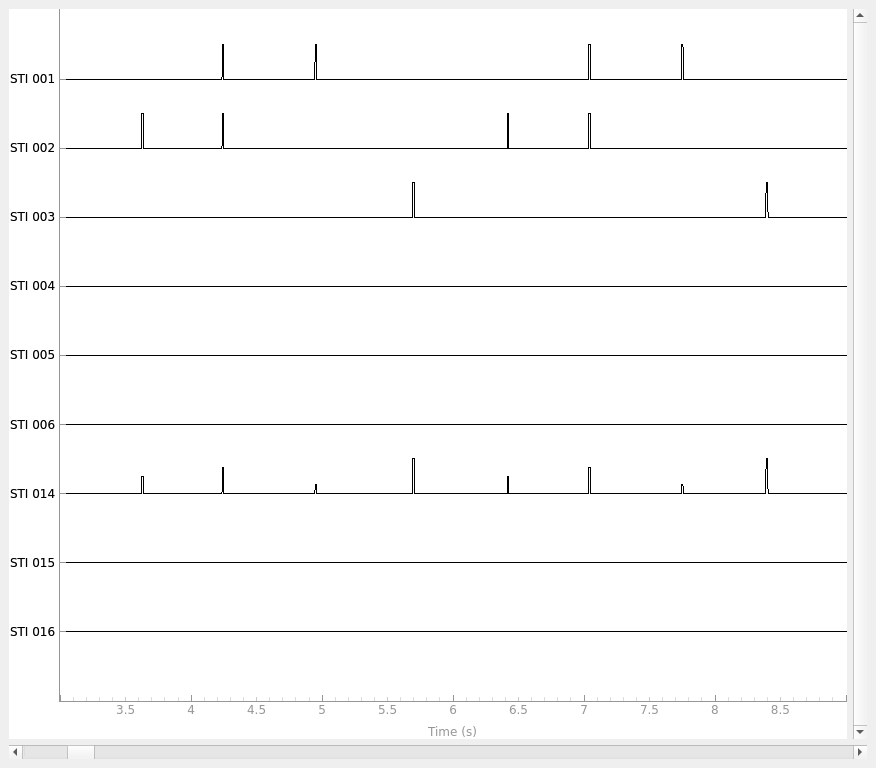
raw.copy().pick(picks="stim").plot(start=3, duration=6)

Using qt as 2D backend.
You can see that STI 014 (the summation channel) contains pulses of
different magnitudes whereas pulses on other channels have consistent
magnitudes. You can also see that every time there is a pulse on one of the
other STIM channels, there is a corresponding pulse on STI 014.
Converting a STIM channel signal to an Events array#
If your data has events recorded on a STIM channel, you can convert them into
an events array using find_events. The sample number of the onset
(or offset) of each pulse is recorded as the event time, the pulse magnitudes
are converted into integers, and these pairs of sample numbers plus integer
codes are stored in NumPy arrays (usually called
“the events array” or just “the events”). In its simplest form, the function
requires only the Raw object, and the name of the channel(s)
from which to read events:
events = mne.find_events(raw, stim_channel="STI 014")
print(events[:5])  # show the first 5
Finding events on: STI 014
86 events found on stim channel STI 014
Event IDs: [ 1  2  3  4  5 32]
[[27977     0     2]
 [28345     0     3]
 [28771     0     1]
 [29219     0     4]
 [29652     0     2]]
If you don’t provide the name of a STIM channel, find_events
will first look for MNE-Python config variables
for variables MNE_STIM_CHANNEL, MNE_STIM_CHANNEL_1, etc. If those are
not found, channels STI 014 and STI101 are tried, followed by the
first channel with type “STIM” present in raw.ch_names. If you regularly
work with data from several different MEG systems with different STIM channel
names, setting the MNE_STIM_CHANNEL config variable may not be very
useful, but for researchers whose data is all from a single system it can be
a time-saver to configure that variable once and then forget about it.
find_events has several options, including options for aligning
events to the onset or offset of the STIM channel pulses, setting the minimum
pulse duration, and handling of consecutive pulses (with no return to zero
between them). For example, you can effectively encode event duration by
passing output='step' to find_events; see the documentation
of find_events for details. More information on working with
events arrays (including how to plot, combine, load, and save event arrays)
can be found in the tutorial Working with events.
Reading embedded events as Annotations#
Some EEG/MEG systems generate files where events are stored in a separate
data array rather than as pulses on one or more STIM channels. For example,
the EEGLAB format stores events as a collection of arrays in the .set
file. When reading those files, MNE-Python will automatically convert the
stored events into an Annotations object and store it as the
annotations attribute of the Raw object:
testing_data_folder = mne.datasets.testing.data_path()
eeglab_raw_file = testing_data_folder / "EEGLAB" / "test_raw.set"
eeglab_raw = mne.io.read_raw_eeglab(eeglab_raw_file)
print(eeglab_raw.annotations)
Reading /home/circleci/mne_data/MNE-testing-data/EEGLAB/test_raw.fdt
<Annotations | 154 segments: rt (74), square (80)>
The core data within an Annotations object is accessible
through three of its attributes: onset, duration, and
description. Here we can see that there were 154 events stored in the
EEGLAB file, they all had a duration of zero seconds, there were two
different types of events, and the first event occurred about 1 second after
the recording began:
print(len(eeglab_raw.annotations))
print(set(eeglab_raw.annotations.duration))
print(set(eeglab_raw.annotations.description))
print(eeglab_raw.annotations.onset[0])
154
{np.float64(0.0)}
{np.str_('rt'), np.str_('square')}
1.000068
More information on working with Annotations objects, including
how to add annotations to Raw objects interactively, and how
to plot, concatenate, load, save, and export Annotations
objects can be found in the tutorial Annotating continuous data.
Converting between Events arrays and Annotations objects#
Once your experimental events are read into MNE-Python (as either an Events
array or an Annotations object), you can easily convert between
the two formats as needed. You might do this because, e.g., an Events array
is needed for epoching continuous data, or because you want to take advantage
of the “annotation-aware” capability of some functions, which automatically
omit spans of data if they overlap with certain annotations.
To convert an Annotations object to an Events array, use the
function mne.events_from_annotations on the Raw file
containing the annotations. This function will assign an integer Event ID to
each unique element of raw.annotations.description, and will return the
mapping of descriptions to integer Event IDs along with the derived Event
array. By default, one event will be created at the onset of each annotation;
this can be modified via the chunk_duration parameter of
events_from_annotations to create equally spaced events within
each annotation span (see Making multiple events per annotation, below, or see
Making equally-spaced Events arrays for direct creation of an Events array of
equally-spaced events).
events_from_annot, event_dict = mne.events_from_annotations(eeglab_raw)
print(event_dict)
print(events_from_annot[:5])
Used Annotations descriptions: [np.str_('rt'), np.str_('square')]
{np.str_('rt'): 1, np.str_('square'): 2}
[[128   0   2]
 [217   0   2]
 [267   0   1]
 [602   0   2]
 [659   0   1]]
If you want to control which integers are mapped to each unique description
value, you can pass a dict specifying the mapping as the
event_id parameter of events_from_annotations; this
dict will be returned unmodified as the event_dict.
Note that this event_dict can be used when creating Epochs from
Raw objects, as demonstrated in the tutorial
The Epochs data structure: discontinuous data.
custom_mapping = {"rt": 77, "square": 42}
(events_from_annot, event_dict) = mne.events_from_annotations(
    eeglab_raw, event_id=custom_mapping
)
print(event_dict)
print(events_from_annot[:5])
Used Annotations descriptions: [np.str_('rt'), np.str_('square')]
{np.str_('rt'): 77, np.str_('square'): 42}
[[128   0  42]
 [217   0  42]
 [267   0  77]
 [602   0  42]
 [659   0  77]]
To make the opposite conversion (from an Events array to an
Annotations object), you can create a mapping from integer
Event ID to string descriptions, use annotations_from_events
to construct the Annotations object, and call the
set_annotations method to add the annotations to the
Raw object.
Because the sample data was recorded on a Neuromag
system (where sample numbering starts when the acquisition system is
initiated, not when the recording is initiated), we also need to pass in
the orig_time parameter so that the onsets are properly aligned relative
to the start of recording:
mapping = {
    1: "auditory/left",
    2: "auditory/right",
    3: "visual/left",
    4: "visual/right",
    5: "smiley",
    32: "buttonpress",
}
annot_from_events = mne.annotations_from_events(
    events=events,
    event_desc=mapping,
    sfreq=raw.info["sfreq"],
    orig_time=raw.info["meas_date"],
)
raw.set_annotations(annot_from_events)
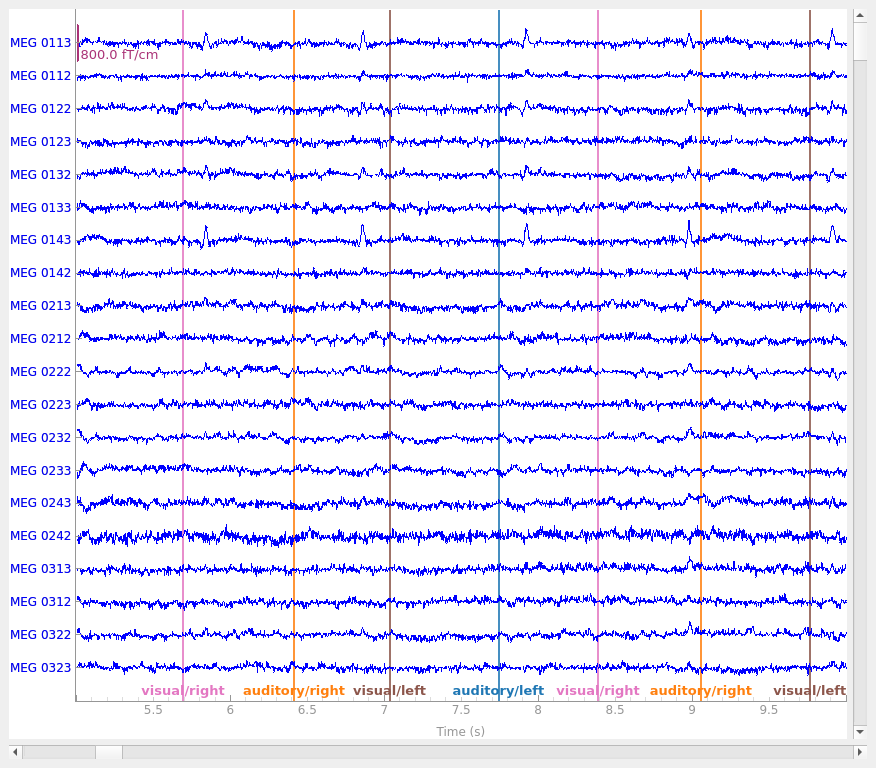
Now, the annotations will appear automatically when plotting the raw data, and will be color-coded by their label value:
raw.plot(start=5, duration=5)

Making multiple events per annotation#
As mentioned above, you can generate equally-spaced events from an
Annotations object using the chunk_duration parameter of
events_from_annotations. For example, suppose we have an
annotation in our Raw object indicating when the subject was
in REM sleep, and we want to perform a resting-state analysis on those spans
of data. We can create an Events array with a series of equally-spaced events
within each “REM” span, and then use those events to generate (potentially
overlapping) epochs that we can analyze further.
# create the REM annotations
rem_annot = mne.Annotations(onset=[5, 41], duration=[16, 11], description=["REM"] * 2)
raw.set_annotations(rem_annot)
(rem_events, rem_event_dict) = mne.events_from_annotations(raw, chunk_duration=1.5)
Used Annotations descriptions: [np.str_('REM')]
Now we can check that our events indeed fall in the ranges 5-21 seconds and 41-52 seconds, and are ~1.5 seconds apart (modulo some jitter due to the sampling frequency). Here are the event times rounded to the nearest millisecond:
print(np.round((rem_events[:, 0] - raw.first_samp) / raw.info["sfreq"], 3))
[ 5.     6.5    8.     9.5   11.    12.501 14.001 15.501 16.999 18.499
 41.    42.5   44.    45.5   47.    48.5   50.   ]
Other examples of resting-state analysis can be found in the online
documentation for make_fixed_length_events.
Total running time of the script: (0 minutes 4.609 seconds)